Mandelbulber’s volume export function is ideally to produce 3d printable objects.
The program produces voxel image slices in black (not in object) and white (in object) , which can be used to reconstruct a 3d model.
The following points provide a guide to produce a 3D printable object. These are based on the great tutorials about doing this in mandelbulb3d:
http://www.henri-hebeisen.com/tag/mandelbulb
http://www.instructables.com/id/Create-a-3D-printed-3D-fractal/
1. Finding the right parameters in Mandelbulber
Printable objects should be rigid objects. In Mandelbulber a lot of structures have holes or really thin surfaces which are unprintable. Some tips in order to produce objects that have always a minimum thickness and are one continuous body:
- Use a low iteration count (somewhere between 5 and 20).
- Use a low ray marching step multiplier to achieve low DE error.
- Use ‘simple’ fractals or hybrids, more parameters often increase the complexity of the fractal body.
Of course there are exceptions to these rules of thumb, but in general these guidelines make it simpler to find a good object.
2. Rendering in Mandelbulber
Take a look at the example settings file: voxel_export_with_Bristorbrot4D.fract
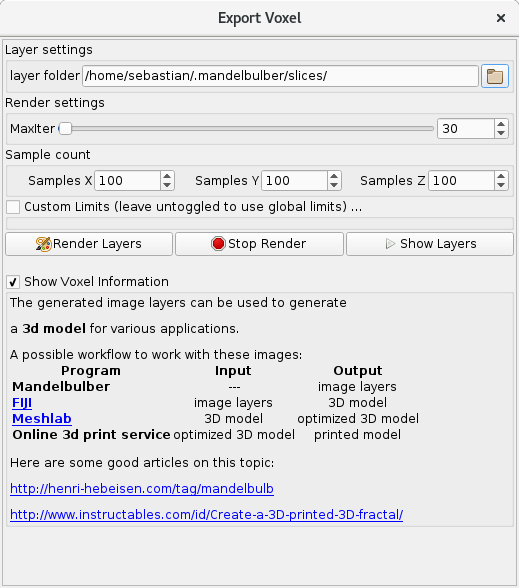
Click on File > Export Voxel Layers this opens up the following popup:

layer folder – The folder points to the folder, where the program will save the outputted slices.
Maxiter – The maximum number of iterations for the render, this overrides the global maxiter setting.
Sample count – The number of samples in each dimension. the z dimension is the stacked dimension.
Custom Limits – The bounding box of the cuboid to render, if not enabled the global limits will be used.
Hit Render Layers to render all images into the layer folder. The image output can be checked with Show Layers.
When all images are rendered properly you can proceed to the next step.
Pro-Tip: First render the cuboid with a low pixel count (eg. 400x400x400 samples). Mandelbulber may be fast in rendering depending on the settings, but the the post processing in FIJI and Meshlab can take up a lot of time for objects 1000x1000x1000 and bigger.
After rendering the test cuboid of 400x400x400 check the output if no parts are cut off, no bad DE, ….
Then you can render the final object in high resolution (maybe 2000x2000x2000 depending on what you want to do).
3. Image stacking in FIJI

The image layers are now ready to be joined into one three-dimensional object. For this purpose FIJI can be used. The software is an open source image processor with a great palette of plug-ins.
Get it here and install it: http://imagej.net/Fiji/Downloads
FIJI has a great script-able interface. Processing steps can be put into makro files, called ijm files. In order to join the layers into one obj file the following script can be used:
3DlayersToObj.ijm
slicesFolder = getArgument;

print("FIJI Processing slices folder: " + slicesFolder);

run("Image Sequence...", "open=" + slicesFolder + "/layer_00000.png sort use");

saveAs("PGM", slicesFolder + "/slices.pgm");

run("Wavefront .OBJ ...", "stack=slices.pgm threshold=0 resampling=1 red save=" + slicesFolder + "/slices.pgm.obj");
And can be applied to the images in the following way:
/path/to/FIJI/ImageJ-linux64 --headless -macro 3DlayersToObj.ijm /path/to/slices
/path/to/slices is:
| Windows | OSX | Linux |
|---|---|---|
| C:\Users\<USERNAME>\mandelbulber\slices | /Users/<USERNAME>/.mandelbulber/slices | /home/<USERNAME>/.mandelbulber/slices |
This may take some time and produce a file named /slices.pgm.obj in the slices folder. That file is a raw 3d object description.
The raw file may still contain double vertices, holes, etc, so it needs to be cleaned in the next step.
You can also do this in the GUI of FIJI, see here for instructions how to do this manually: http://www.instructables.com/id/Create-a-3D-printed-3D-fractal/step6/Stack-the-Slices/
4. Mesh optimization in Meshlab
 Meshlab is a 3d mesh processor, you can get it here http://meshlab.sourceforge.net/ or install it with your favorite package manager.
It can be scripted in quite the same way as FIJI with a makro file called mlx. The following file can be used to apply “common” optimization / cleaning steps on the obj file:
optimizeObjWithMeshlab.mlx
<!DOCTYPE FilterScript>

<FilterScript>

<filter name="Invert Faces Orientation">

<Param type="RichBool" value="true" name="forceFlip"/>

</filter>

<filter name="Merge Close Vertices">

<Param type="RichAbsPerc" value="0.18326" min="0" name="Threshold" max="18.3258"/>

</filter>

<filter name="Quadric Edge Collapse Decimation">

<Param type="RichInt" value="200000" name="TargetFaceNum"/>

<Param type="RichFloat" value="0" name="TargetPerc"/>

<Param type="RichFloat" value="0.3" name="QualityThr"/>

<Param type="RichBool" value="false" name="PreserveBoundary"/>

<Param type="RichFloat" value="1" name="BoundaryWeight"/>

<Param type="RichBool" value="true" name="PreserveNormal"/>

<Param type="RichBool" value="false" name="PreserveTopology"/>

<Param type="RichBool" value="true" name="OptimalPlacement"/>

<Param type="RichBool" value="true" name="PlanarQuadric"/>

<Param type="RichBool" value="false" name="QualityWeight"/>

<Param type="RichBool" value="true" name="AutoClean"/>

<Param type="RichBool" value="false" name="Selected"/>

</filter>

<filter name="HC Laplacian Smooth"/>

<filter name="Remove Faces from Non Manifold Edges"/>

<filter name="Transform: Scale">

<Param type="RichDynamicFloat" value="1" min="0.1" name="axisX" max="10"/>

<Param type="RichDynamicFloat" value="1" min="0.1" name="axisY" max="10"/>

<Param type="RichDynamicFloat" value="1" min="0.1" name="axisZ" max="10"/>

<Param type="RichBool" value="true" name="uniformFlag"/>

<Param enum_val0="origin" enum_val1="barycenter" enum_cardinality="3" enum_val2="custom point" type="RichEnum" value="0" name="scaleCenter"/>

<Param x="0" y="0" z="0" type="RichPoint3f" name="customCenter"/>

<Param type="RichBool" value="true" name="unitFlag"/>

<Param type="RichBool" value="true" name="Freeze"/>

<Param type="RichBool" value="false" name="ToAll"/>

</filter>

<filter name="Transform: Scale">

<Param type="RichDynamicFloat" value="10" min="0.1" name="axisX" max="10"/>

<Param type="RichDynamicFloat" value="1" min="0.1" name="axisY" max="10"/>

<Param type="RichDynamicFloat" value="1" min="0.1" name="axisZ" max="10"/>

<Param type="RichBool" value="true" name="uniformFlag"/>

<Param enum_val0="origin" enum_val1="barycenter" enum_cardinality="3" enum_val2="custom point" type="RichEnum" value="0" name="scaleCenter"/>

<Param x="0" y="0" z="0" type="RichPoint3f" name="customCenter"/>

<Param type="RichBool" value="false" name="unitFlag"/>

<Param type="RichBool" value="true" name="Freeze"/>

<Param type="RichBool" value="false" name="ToAll"/>

</filter>

<filter name="Transform: Scale">

<Param type="RichDynamicFloat" value="2" min="0.1" name="axisX" max="10"/>

<Param type="RichDynamicFloat" value="1" min="0.1" name="axisY" max="10"/>

<Param type="RichDynamicFloat" value="1" min="0.1" name="axisZ" max="10"/>

<Param type="RichBool" value="true" name="uniformFlag"/>

<Param enum_val0="origin" enum_val1="barycenter" enum_cardinality="3" enum_val2="custom point" type="RichEnum" value="0" name="scaleCenter"/>

<Param x="0" y="0" z="0" type="RichPoint3f" name="customCenter"/>

<Param type="RichBool" value="false" name="unitFlag"/>

<Param type="RichBool" value="true" name="Freeze"/>

<Param type="RichBool" value="false" name="ToAll"/>

</filter>

</FilterScript>
And can be applied to the obj file in the following way:
meshlabserver -i /path/to/slices/slices.pgm.obj -o/path/to/slices/3dObjectOptimized.stl -s optimizeObjWithMeshlab.mlx
TargetFaceNum should be adopted to a reasonable value (~100000 for a testrender, 1000000 for a good result).
You will end up with the file 3dObjectOptimized.stl,a 3d object file which can be used in a variety of software.
You can also do this in the GUI of Meshlab, see here for instructions how to do this manually: http://www.instructables.com/id/Create-a-3D-printed-3D-fractal/step7/Clean-Up-Your-Mesh/
5. Use the model
- Import the model into blender for rendering
- print it in a 3d printer or let it print by 3d print service
- or simply enjoy the file lying around in your filesystem! 🙂